【概要】 昔からunix系にあるddコマンドはディスクコピーに重宝する強力なツールです。取り出した内蔵ハードディスクのデータをddコマンドを使って、コピーする方法についてまとめました。さらに、ddコマンドで落としたディスクイメージファイルをマウントする方法についても説明します。
1. はじめに
前回までの記事でdynabook内蔵の1TBのハードディスクを取り出しまでについて書きました。今回は、このハードディスクの中に入っているデータのコピーについて説明します。
2. 外付けディスクケース
内蔵ハードディスクのままでは扱えませんので、外付けのディスクケースに入れて使用します。
今回、用いた外付けのディスクケースは、玄人志向とCenturyの製品です。Centuryの製品は8年ぐらい前に購入した古いもの。最近は、玄人志向の製品を使うことが多いです。
メーカページ
ELUTENG
玄人志向ではないが、UASP対応のスケルトンケース。
タイムセールで思わず衝動買いしてしまった。
-->
今回は、別のLinuxパソコンを使って、内蔵ハードディスクをディスクケースに入れて、外付けディスクとして取り扱いました。ubuntuのLive CD/USBなどを作って、元々のパソコンをLinuxマシンとして起動できれば、内蔵HDDを取り出さずに、外部デバイスにコピーできます。考えてみると、Live USBを作ってLinux上で作業した方が良かったかもしれません(が、わざわざマシンが壊れたときに作るのは面倒。余裕のあるときに予め作っておくのがよいのでしょうね)。
3. ディスクの障害診断
lubuntuをインストールしたHP miniにHDDを接続して、SMART(Self-Monitoring, Analysis and Reporting Technology)の情報を調べました(SMARTの各項目の意味は、ウィキペディア参照)。
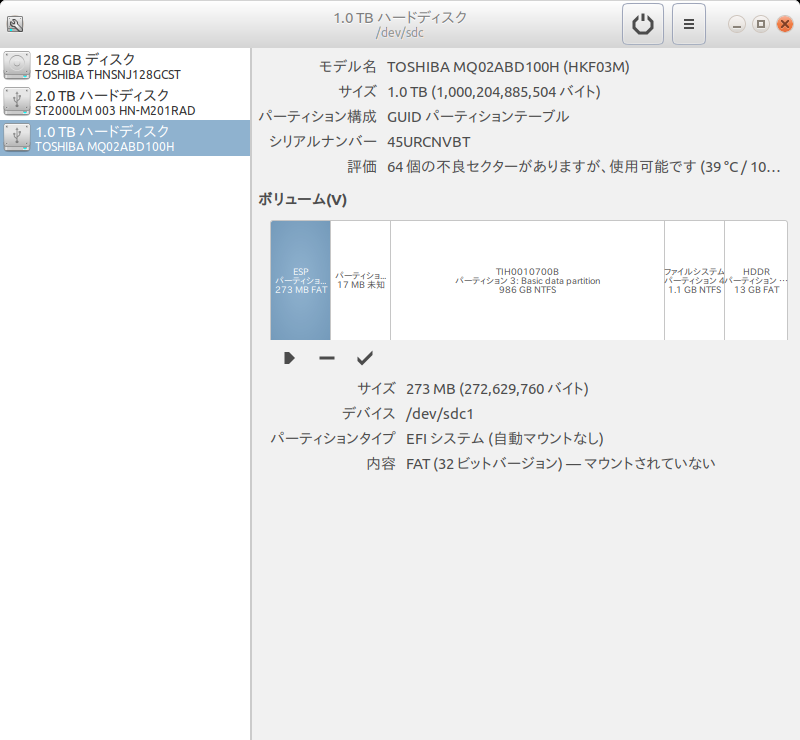
画像は、gnome-disksの画面です。64個の不良セクターがあり、HDD障害が発生していることが分かります。ひどい状態です。まともに動作しないのも納得。
$ gnome-disks

あるいは、「アクセサリ」→「ディスク」から起動(lubuntuの場合)

不良セクターが64個あります。使用可能となっていますが、不良セクターが64個もあれば、ディスクは即交換です。

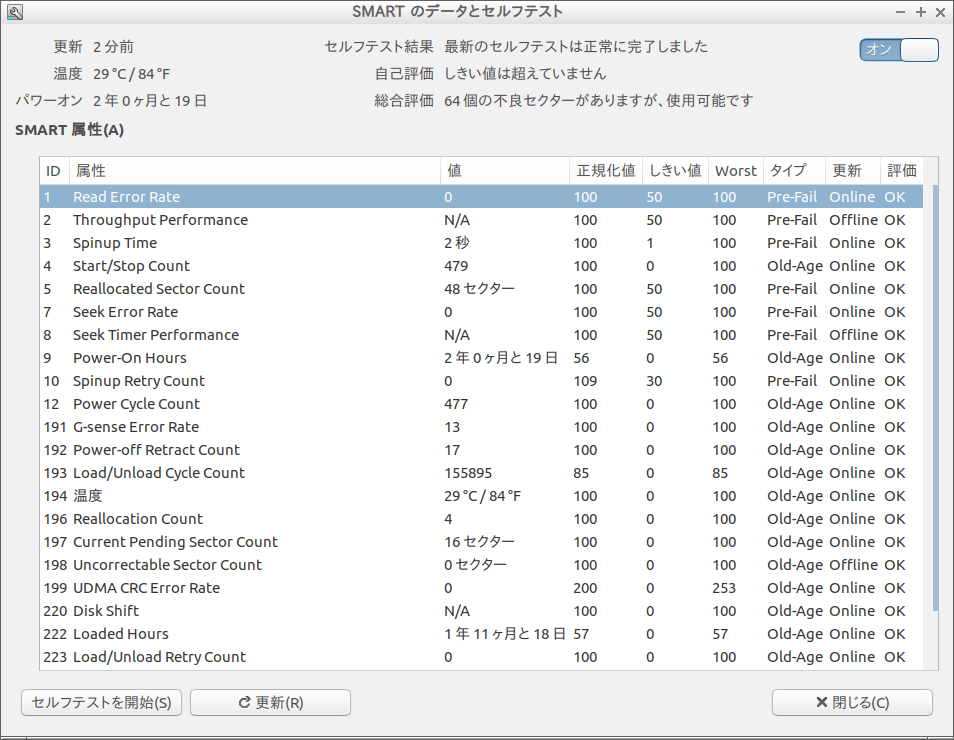
SMARTのセルフテストの結果。
Current Pending Sector Countが16。16セクタが代替処理ができずにいる。
4. ディスクのコピー
ディスクのコピーにはいろいろやり方はありますので、いくつか紹介します。実際に行ったのは、4.1.1節で説明する丸ごとディスク内容を抜き出して、ファイルに落とす方法です。
4.1 ディスクを丸ごとコピーする
4.1.1 ディスク内容を丸ごとファイルに落とす
ddコマンドを使って、ディスクの内容をそのままファイルに落とします。
一旦、全部をファイルに落とすので、その後は、壊れかけのディスクにアクセスせずに取り扱えるようになります。出力したファイルは、ハードディスクにディスク内容を書き戻し(4.1.3節)やファイルをディスクと見立てたマウント(4.2.2節)のために利用します。
$ dd if=/dev/sdc of=dynabook-az77-1tb-hdd.img bs=1M
出力ファイルは、容量1TBになります。従って、of(output file)には、1TB以上の空きが必要です。今回は、2TBハードディスクをバックアップ用に用意しました。
bsオプション(ブロックサイズ)は、1M~16Mぐらいを指定すればよいと思います。以下では、bsオプションの記載は省略します。
4.1.2 ディスク内容を丸ごとディスクにコピーする
$ dd if=/dev/sdc of=/dev/sdb
出力先のディスク(ここでは、/dev/sdb)は、1TB以上の容量が必要です。丸ごとコピーするので、コピーしたディスクをそのままもとの筐体に戻せば、復旧するはずです(もしかしたら、BIOSや起動フラグなどの設定が必要かもしれません)。
1TB以上の場合には、その後、パーティションを作成、あるいは、拡張することで、余った部分を有効利用できます。
また、dynabook内蔵のHDDは、東芝製のSSHD MQ02ABD100Hでしたので、SSDへ換装しないなら、同じハードディスクを使う方が安心です。
玄人志向
丸ごとディスクコピーができます。
製品情報。Amazon's Choice
4.1.3 ファイルからディスクへ丸ごとコピーする
4.1.1節で説明したようにddコマンドでファイルに落としたディスク内容は、ddコマンドを使って、ハードディスクに書き出すことができます。
$ dd if=dynabook-az77-1tb-hdd.img of=/dev/sdb
ここでは、/dev/sdbが出力先のデバイスです。要するに、ddコマンドは、ファイルも、デバイスも同じように扱うことができるのです。
4.2 パーティション単位でコピーする
ddを使えば、パーティション単位のコピーもできます。今回のディスクのパーティションは5つありますので、次のようにすれば、全てのパーティションをコピーできます。
$ dd if=/dev/sdc1 of=disk-part-1.img
$ dd if=/dev/sdc2 of=disk-part-2.img
$ dd if=/dev/sdc3 of=disk-part-3.img
$ dd if=/dev/sdc4 of=disk-part-4.img
$ dd if=/dev/sdc5 of=disk-part-5.img
この場合、パーティションテーブルは保存されませんので、別途、gdiskを使って保存します。
$ gdisk /dev/sdc
Command (? for help): b
Enter backup filename to save: gpt-table.dat
The operation has completed successfully.
4.3 ディスク内容を個別にコピーする
ディスクをマウントして、それぞれのファイルを見られるようにすれば、必要なファイルを選択的にコピーすることができます。
4.3.1 ディスクをマウントする
$ mkdir /mnt/tmp
$ mount /dev/sdc3 /mnt/tmp
マウントポイント(/mnt/tmp)を作成し、そこへWindowsのユーザーが通常アクセスする3番目のパーティション(この例では、/dev/sdc3)をマウントします。その後は、通常のファイル・ディレクトリと同様に、cpコマンドやrsyncコマンドなどを用いて内容をコピーします(個人的にはrsyncの方が好みです)。
$ cp -dpr /mnt/tmp/Users/tora tora_backup/
$ rsync -av /mnt/tmp/Users/tora/ tora_backup/
(rsyncは、ソース側の最後のディレクトリデリミタ"/"の有無で動作が異なるので要注意)
4.3.2 ファイルをマウントする
ファイルシステムのマウントはディスクのみならず、4.1.1でディスク内容を丸ごと落としたファイルでも可能です。このファイルをマウントすることで、前節と同様にファイルをコピーできます*1。
(ループバックデバイスの確認)
$ losetup -f
/dev/loop0

(イメージファイルをループバックデバイスに関連付ける)
$ losetup /dev/loop0 dynabook-az77-1tb-hdd.img

(ループバックデバイスのパーティションを認識させる)
$ partprobe /dev/loop0

(3番目のパーティションをマウントする)
$ mkdir /mnt/tmp
$ mount /dev/loop0p3 /mnt/tmp

(コピーなど作業する)

(マウントを解除する)
$ umount /mnt/tmp

(ループバックデバイスの関連付けを解除する)
$ losetup -d /dev/loop0
しかし、この方法でのファイルの抜き出しで、少々、トラブルがありましたので、付録Aで説明します。
5. まとめ
昔からunix系にあるddコマンドを使って、ハードディスクのデータをコピーする方法についてまとめました。さらに、ddコマンドで落としたディスクイメージファイルをマウントする方法についても説明しまた。
次の記事では、ダンプしたディスク内容のSSDへの書き戻しについて説明します。
(2018/8/23)
関連記事
付録A:ディスクイメージがマウントできない
ddでコピーしたディスクイメージのloopデバイスを使ったマウントについて4.3.2節で説明しました。しかし、マウントできないというトラブルがありました。
ここでは、そのトラブルと対処方法について説明します。
A.1 partprobeでパーティションが認識できない
4.3.2節では、ディスクイメージとloopデバイスをlosetupで関連付けた後、partprobeでディスクイメージのパーティションを認識させます。このときに、次のエラーが発生しました。
$ losetup /dev/loop0 dynabook-az77-1tb-hdd.img
$ partprobe /dev/loop0
Error: /dev/loop0 を読み込み中にファイルの終わりに達しました
A.2 partedでloopデバイスを調べる
partedでパーティションを調べると、partprobeと同じメッセージがでてきましたが、無視して調べると、GPTテーブルが壊れていると出てきます。不吉です。それでも、一応は、パーティションを見ることができました。
$ parted /dev/loop0
GNU Parted 3.2
/dev/loop0 を使用
GNU Parted へようこそ! コマンド一覧を見るには 'help' と入力してください。
(parted) p
エラー: /dev/loop0 を読み込み中にファイルの終わりに達しました
やりなおし(R)/Retry/無視(I)/Ignore/取消(C)/Cancel? I
エラー: バックアップ GPT テーブルは壊れていますが、プライマリは問題ないようなので、そちらを使います。
OK/取消(C)/Cancel? OK
モデル: Loopback デバイス (loopback)
ディスク /dev/loop0: 1000GB
セクタサイズ (論理/物理): 512B/512B
パーティションテーブル: gpt
ディスクフラグ:

番号  開始    終了    サイズ  ファイルシステム  名前                          フラグ
 1    1049kB  274MB   273MB   fat32             EFI system partition          boot, esp
 2    274MB   290MB   16.8MB                    Microsoft reserved partition  msftres
 3    290MB   987GB   986GB   ntfs              Basic data partition          msftdata
 4    987GB   988GB   1061MB  ntfs                                            hidden, diag
 5    988GB   1000GB  12.5GB  fat32             Basic data partition          hidden, diag
A.3 gdiskを使って修復
gdiskを使って、loop0を見ようとすると、今度はディスクを修復するようにとのメッセージがでます。修復することにしましたが、ディスクイメージを破壊する可能性があるので、オリジナルのディスクイメージではなく、そのコピーに対して修復を行いました(バックアップ用の2TBでは、容量が足りないので、さらに2TBのディスクを用意しました)。
パーティションテーブルの問題点や修復作業についてはわけがわからないまま、コマンドの指示に従って作業を進めました(笑)。長いですが、全部、引用しておきます。
- バックアップGPTヘッダ(第2GPTヘッダ)が壊れているので、修復するように言われました。
$ gdisk /dev/loop0
GPT fdisk (gdisk) version 1.0.3

Warning! Disk size is smaller than the main header indicates! Loading
secondary header from the last sector of the disk! You should use 'v' to
verify disk integrity, and perhaps options on the experts' menu to repair
the disk.
Caution: invalid backup GPT header, but valid main header; regenerating
backup header from main header.

Partition table scan:
  MBR: protective
  BSD: not present
  APM: not present
  GPT: damaged

****************************************************************************
Caution: Found protective or hybrid MBR and corrupt GPT. Using GPT, but disk
verification and recovery are STRONGLY recommended.
****************************************************************************
- それでも、パーティション情報を出力すると、一見正しそうな情報を出力しました。
Command (? for help): p
Disk /dev/loop0: 1953525167 sectors, 931.5 GiB
Sector size (logical/physical): 512/512 bytes
Disk identifier (GUID): B45D2A5C-F9A4-478D-818B-D8E6280ABEA4
Partition table holds up to 128 entries
Main partition table begins at sector 2 and ends at sector 33
First usable sector is 34, last usable sector is 1953525134
Partitions will be aligned on 8-sector boundaries
Total free space is 4642 sectors (2.3 MiB)

Number  Start (sector)    End (sector)  Size       Code  Name
   1            2048          534527   260.0 MiB   EF00  EFI system partition
   2          534528          567295   16.0 MiB    0C01  Microsoft reserved ...
   3          567296      1926947658   918.6 GiB   0700  Basic data partition
   4      1926948864      1929021439   1012.0 MiB  2700
   5      1929022863      1953525134   11.7 GiB    2700  Basic data partition
- gdiskの指示に従って、コマンド"v"(verify disk)を実行すると、3つの問題点を指摘されました。
Command (? for help): v

Problem: The secondary header's self-pointer indicates that it doesn't reside
at the end of the disk. If you've added a disk to a RAID array, use the 'e'
option on the experts' menu to adjust the secondary header's and partition
table's locations.
(→ 第2ヘッダーに書かれている自分の位置は、ディスクの最後になっていない)

Problem: Disk is too small to hold all the data!
(Disk size is 1953525167 sectors, needs to be 1953525168 sectors.)
The 'e' option on the experts' menu may fix this problem.
(→ ディスクのサイズが1セクタ足りない)

Partition(s) in the protective MBR are too big for the disk! Creating a
fresh protective or hybrid MBR is recommended.
(→ MBRに書かれているパーティションが大きすぎる)

Caution: Partition 5 doesn't begin on a 8-sector boundary. This may
result in degraded performance on some modern (2009 and later) hard disks.

Consult http://www.ibm.com/developerworks/linux/library/l-4kb-sector-disks/
for information on disk alignment.
(このCautionはあまり気にする必要はなさそう)

Identified 3 problems!
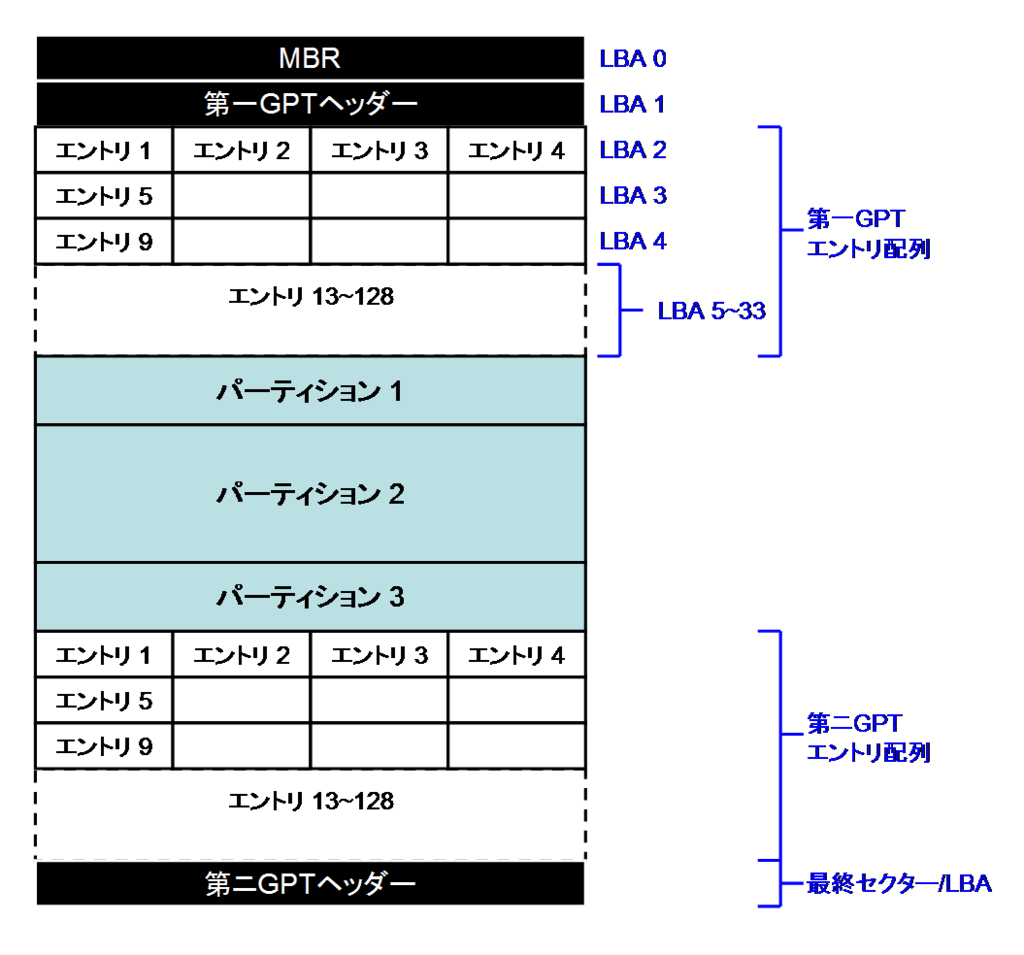
パーティションテーブルのレイアウトが分からないと、何をいっているか、チンプンカンプンです。ウィキペディアによれば、パーティションテーブルは、以下の図のように配置されています。

パーティションテーブルのレイアウト。(wikipediaより引用)
各LBAは512バイト、各エントリは128バイト。
2番目の問題(Disk is too small)は、ディスクサイズが1セクタ足りないとの指摘です。おそらく、ディスクの最後の1セクタ(512バイト)がディスクイメージのファイルに保存されていないことが原因と考えられます。
ダンプされたディスクイメージのファイルサイズは、1,000,204,885,504バイト(=1,953,525,167セクタ×512バイト)です。一方、パーティションテーブルには、それよりも1つ多い1,953,525,168セクタあると、書いてあるのではないかと思います。
第2ヘッダーの位置は、ディスクの最後と決まっているので、最後の1セクタがダンプされていないと、第2ヘッダーに書かれている位置と、ディスクイメージの最後から数えたヘッダの位置に不整合が発生します。これが第1の問題である第2ヘッダの自己ポインタが変だという検査結果となり、第2GPTヘッダは、壊れていると判断されます。
第2GPTヘッダは壊れていますので、パーティション構成の解釈は、MBRによってなされます。MBRに記録されているセクタ数がダンプしたファイルのセクタ数よりも大きくなっているので、第3の問題点(MBRのパーティションが大きすぎる)を指摘されます。
- experts' menuに入って、eオプションを実行。
experts' menu のeコマンドは、「relocate backup data structures to the end of the disk」という処理です。意味をよく理解していませんが、第2GPTヘッダをディスクの最後に配置しなおす(前にずらす)ということだと思います。
Command (? for help): x
(コマンドxでexperts menuに入ります)

Expert command (? for help): e
Relocating backup data structures to the end of the disk

Expert command (? for help): p
Disk /dev/loop0: 1953525167 sectors, 931.5 GiB
Sector size (logical/physical): 512/512 bytes
Disk identifier (GUID): B45D2A5C-F9A4-478D-818B-D8E6280ABEA4
Partition table holds up to 128 entries
Main partition table begins at sector 2 and ends at sector 33
First usable sector is 34, last usable sector is 1953525133
Partitions will be aligned on 8-sector boundaries
Total free space is 4642 sectors (2.3 MiB)

Number  Start (sector)    End (sector)  Size       Code  Name
   1            2048          534527   260.0 MiB   EF00  EFI system partition
   2          534528          567295   16.0 MiB    0C01  Microsoft reserved ...
   3          567296      1926947658   918.6 GiB   0700  Basic data partition
   4      1926948864      1929021439   1012.0 MiB  2700
   5      1929022863      1953525134   11.7 GiB    2700  Basic data partition
"last usable sector" が"1,953,525,134"から1,953,525,133に一つ減りました。
- 再度、vコマンド(verify disk)を行うと、問題点は1つなりました。
今度は、コマンド"s"(resize partition table)を使ってパーティションテーブルサイズを4つ減らせとのこと。
第2ヘッダを1セクタ前にずらしていますので、パーティション5の最後の1セクタと第2GPTエントリーの1セクタが重複します。この重複を解消するために、1セクタ(512バイト)の大きさ分の4エントリ(4エントリ×128バイト=512バイト)を減らす必要があるということかと思います。
Expert command (? for help): v

Warning! Secondary partition table overlaps the last partition by
1 blocks!
Try reducing the partition table size by 4 entries.
(Use the 's' item on the experts' menu.)

Caution: Partition 5 doesn't begin on a 8-sector boundary. This may
result in degraded performance on some modern (2009 and later) hard disks.

Consult http://www.ibm.com/developerworks/linux/library/l-4kb-sector-disks/
for information on disk alignment.

Identified 1 problems!
- expertコマンドs(resize partition table)を実行
partition table sizeを128から124に減らすと、今度はエントリーが少なすぎると警告される。
Expert command (? for help): s
Current partition table size is 128.
Enter new size (5 up, default 128): 124
Caution: The partition table size should officially be 16KB or larger,
which works out to 128 entries. In practice, smaller tables seem to
work with most OSes, but this practice is risky. I'm proceeding with
the resize, but you may want to reconsider this action and undo it.
- partition table sizeを124,128,132と変更してみた。
partition table sizeを124にすれば、エントリーが足らないと注意され、128以上にすると、第2パーティションテーブルが、最終パーティションとオーバーラップすると注意されます。
使えるセクターが一つ減った影響で、パーティションテーブルがオーバーラップするか、パーティションテーブルを小さくするかの選択を迫っているということのようです。
最終的には、パーティションテーブルサイズを124としました。エントリー数が減る影響をよく理解していませんが、大量にパーティションを切らない限り影響はないのではないかと思っています。
Expert command (? for help): v

Warning: The size of the partition table (15872 bytes) is less than the minimum
required by the GPT specification. Most OSes and tools seem to work fine on
such disks, but this is a violation of the GPT specification and so may cause
problems.

Caution: Partition 5 doesn't begin on a 8-sector boundary. This may
result in degraded performance on some modern (2009 and later) hard disks.

Consult http://www.ibm.com/developerworks/linux/library/l-4kb-sector-disks/
for information on disk alignment.

No problems found. 4643 free sectors (2.3 MiB) available in 3
segments, the largest of which is 2015 (1007.5 KiB) in size.

Expert command (? for help): s
Current partition table size is 124.
Enter new size (5 up, default 128):

Warning! Secondary partition table overlaps the last partition by
1 blocks!
Try reducing the partition table size by 4 entries.
(Use the 's' item on the experts' menu.)

Expert command (? for help): s
Current partition table size is 128.
Enter new size (5 up, default 128): 132

Warning! Secondary partition table overlaps the last partition by
2 blocks!
Try reducing the partition table size by 8 entries.
(Use the 's' item on the experts' menu.)

Expert command (? for help): s
Current partition table size is 132.
Enter new size (5 up, default 128): 124
Caution: The partition table size should officially be 16KB or larger,
which works out to 128 entries. In practice, smaller tables seem to
work with most OSes, but this practice is risky. I'm proceeding with
the resize, but you may want to reconsider this action and undo it.
- expertメニューからメインメニューに戻り、再度、検証(v)し、パーティションテーブルの修正結果の書込み(w)を行いました。
Expert command (? for help): m

Command (? for help): v

Warning: The size of the partition table (15872 bytes) is less than the minimum
required by the GPT specification. Most OSes and tools seem to work fine on
such disks, but this is a violation of the GPT specification and so may cause
problems.

Caution: Partition 5 doesn't begin on a 8-sector boundary. This may
result in degraded performance on some modern (2009 and later) hard disks.

Consult http://www.ibm.com/developerworks/linux/library/l-4kb-sector-disks/
for information on disk alignment.

No problems found. 4643 free sectors (2.3 MiB) available in 3
segments, the largest of which is 2015 (1007.5 KiB) in size.

Command (? for help): w

Final checks complete. About to write GPT data. THIS WILL OVERWRITE EXISTING
PARTITIONS!!

Do you want to proceed? (Y/N): y
OK; writing new GUID partition table (GPT) to /dev/loop0.
Warning: The kernel is still using the old partition table.
The new table will be used at the next reboot or after you
run partprobe(8) or kpartx(8)
The operation has completed successfully.
最終的に次のようなパーティションテーブルとなりました。当初"damaged" だった、GPTパーティションテーブルも"present"と正常になりました。
$ gdisk /dev/loop0
GPT fdisk (gdisk) version 1.0.3

Partition table scan:
  MBR: protective
  BSD: not present
  APM: not present
  GPT: present

Found valid GPT with protective MBR; using GPT.

Command (? for help): p
Disk /dev/loop0: 1953525167 sectors, 931.5 GiB
Sector size (logical/physical): 512/512 bytes
Disk identifier (GUID): B45D2A5C-F9A4-478D-818B-D8E6280ABEA4
Partition table holds up to 124 entries
Main partition table begins at sector 2 and ends at sector 32
First usable sector is 33, last usable sector is 1953525134
Partitions will be aligned on 8-sector boundaries
Total free space is 4643 sectors (2.3 MiB)

Number  Start (sector)    End (sector)  Size       Code  Name
   1            2048          534527   260.0 MiB   EF00  EFI system partition
   2          534528          567295   16.0 MiB    0C01  Microsoft reserved ...
   3          567296      1926947658   918.6 GiB   0700  Basic data partition
   4      1926948864      1929021439   1012.0 MiB  2700
   5      1929022863      1953525134   11.7 GiB    2700  Basic data partition
- 修復前から変化した点は、次の通りです。
- パーティションテーブルのサイズ:128→124エントリー
- メインパーティションテーブルの終了セクター:33→32
- 使用可能な最初のセクター:34→33
- フリースペース:4642セクター → 4643セクター
第2ヘッダのサイズが小さくなった影響を受けて、第1ヘッダのサイズも小さくなり、利用できるセクターが1セクタ増えたということのようです。
この修正により、partprobe /dev/loop0も正常動作するようになり、パーティションを正しく認識するようになりました。
A.4 パーティションテーブルのダンプと修正
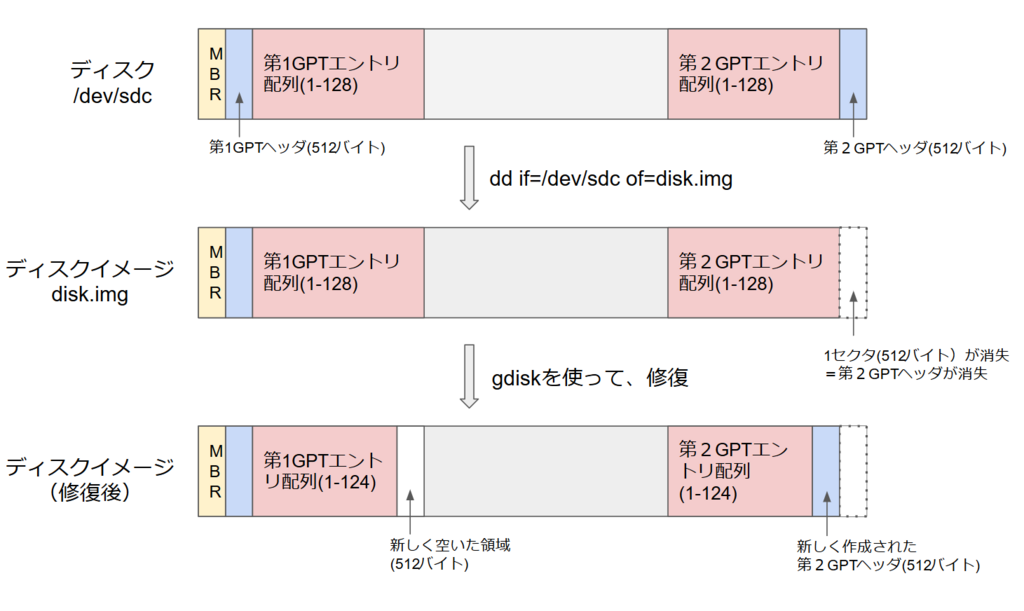
gdiskの修復メッセージから類推すると、以下の図に示すような現象が起こっていたと思われます。まず、ddによるダンプによって、1セクタのコピー漏れが発生し、第2GPTヘッダが消失します。その第2GPTヘッダを新規作成するために、エントリー配列の大きさを128から124に減らし、1セクタ分小さくします。これに伴って、第1GPTエントリ配列も124エントリとなり、第1エントリ配列の直後の1セクタが新規に空き領域となります。

しかし、dynabookの壊れかけている内蔵ディスク/dev/sdcを直接gdiskコマンドで、調べたところ、ddでダンプしたディスクイメージと全く同じように第2GPTヘッダが壊れていました。ddが書き漏らしたのではなく、最初からディスク末尾の1セクタ(512バイト)が欠けていたのかもしれません。また、もともとWindowsでは、パーティションテーブルを正しく書いていない、という可能性もありますが、よく分かりません。
(追記:2018/9/21)この現象は、外付けハードディスクによって、読み取ることができるセクター数が異なることが原因と判明しました。
本稿でハードディスクのddダンプで用いたのは、Centuryの製品です。また、作業用に用いていたのは、玄人志向の製品です。この二つの製品では、ハードディスクの最後の1セクタ (512バイト) を読み取ることはできず、欠損が生じます。
これは、その後に購入した ELUTENG のディスクケースと玄人志向・Centuryのディスクケースでは、認識するディスクサイズが異なることから気が付きました(詳しくは、 この記事を参照)。
実際、1TBのハードディスクの末尾の1セクタをELUTENGのディスクケースを使って読み込んで、Centuryのディスクケースでddダンプしたファイルの末尾に追加すると、gdiskは正常にGPTテーブルを解釈します。
● センチュリー
● 玄人志向
● ELUTENG
ELUTENG 先月購入したスケルトンケース。アクセスランプが綺麗。
|
A.5 もしかしたら、ディスクイメージの末尾に512バイト追加すればよかったのかも...
パーティションの修復が必要なのは、ディスクイメージが1セクタ分欠けていることが原因と考えられます。gdiskを使った修復では、パーティションテーブルのサイズを128エントリから124エントリに減らしましたが、それだと、GPTヘッダの仕様で要求される128エントリを確保できません。
そうであれば、次のような方法で、ディスクイメージに512バイト追加すれば、128エントリーを確保できるのではないかと思います。
- ddでダンプする際に必要なセクタ数を明示的に指定してコピーする。
$ dd if=/dev/sdc of=disk.img count=1953525168
もしかしたら、オリジナルのディスクの第2ヘッダの情報が正しくコピーされるかもしれません。そうであれば、partprobeも問題なく通過するでしょう。(しかし、ddで末尾までスキップして、ダンプしたところでは、期待していた1953525168番目のセクタは読みだせませんでした)
- ディスクの最後の1セクタだけを読みだして、既にダンプしたディスクイメージに追加する
$ dd if=/dev/sdc skip=1953525167 count=1 >> disk.img
dynabookに入っていた壊れかけたハードディスクの全データをダンプするのは大変です。この方法では、最後の1セクタだけを読み出して、既にダンプしたファイルに追加します。
実際に行ったところ、 skip=1953525166まではスキップできましたが、1つ増やして1953525167とすると、エラーとなりました。やはり、1953525168番目のセクタは読みだせないようです。
- ダンプしたディスクイメージの末尾に512バイトの0値を付け加える
$ dd if=/dev/zero count=1 >> disk.img
この方法では、第2GPTヘッダを修復する必要はあります。実際に試したところ、128エントリーを保ったままパーティションテーブルを修復することができました(付録B参照)。
付録B:ファイルに1セクタ追加して、GPTヘッダを修復
ddコマンドでダンプしたディスクイメージは、1セクタ(512バイト)欠けているようでした。このため、512バイトの0値をファイル末尾に追加して大きくしたファイルに対して、gdisk を使って、パーティションテーブルを修復しました。これによって、エントリー数を削減することなく、仕様通りのGPTヘッダを作ることができます。
B.1 マウントできるか?
partprobe でエラーメッセージがでますが、マウントできて、ディスク内のファイルも参照できます。
$ losetup -f
/dev/loop0
$ losetup /dev/loop0 dynabook-az77_1tb-hdd+1sector.img
$ partprobe /dev/loop0
Error: バックアップ GPT テーブルは壊れていますが、プライマリは問題ないようなので、そちらを使います。
$ mount /dev/loop0p3 /mnt/tmp1/
The disk contains an unclean file system (0, 0).
Metadata kept in Windows cache, refused to mount.
Falling back to read-only mount because the NTFS partition is in an
unsafe state. Please resume and shutdown Windows fully (no hibernation
or fast restarting.)
$ ls  /mnt/tmp1/Users/tora/
'3D Objects'/
 AppData/
'Application Data'@
 Contacts/
 Cookies@
 Desktop/
 Documents/
 Downloads/
 Favorites/
 GoogleDrive/
(略)
バックアップGPTテーブルは、壊れていると言われますが、マウントできました(read-onlyとなるのは、Windowsでのシャットダウンで完全シャットダウンを行っていないため)。また、ファイルも見ることができます。
B.2 パーティションテーブルの修復
gdiskを使って第2GPTヘッダを修復しました。第1GPTヘッダを使って修復するコマンドが分からなかったので、一旦、パーティションテーブルを124エントリに縮小し、128エントリに戻すことで、第2GPTヘッダを作っています。
リカバリーモード("r")のそれらしいコマンド (d, e, f) を試してみましたが、期待した通りの結果は得られませんでした。
コマンドとしては、次の順序で行っています。
- x (experts' menuに入る) → s (リサイズする) → 124を入力 → s (リサイズする) → 128を入力 → w (パーティションテーブルを書き込む) → yを入力
作業にあたっての注意点としては、次の点が挙げられます。
- パーティションテーブルのバックアップを取ること
パーティションテーブルを破壊してしまったときに役立つはずです。
- パーティション内容をよく確認すること
特に、編集したパーティションテーブルをディスクに書き込む前には、v(検証)だけでなく、p(プリント)も出力して内容をよく確認します。
両方ともに、さぼったので、実際に、操作を間違えて、パーティションテーブルを破壊し、ディスクイメージを使いものにならなくしてしまいました!(オリジナルコピーからやり直し)
なお、実際のログは、以下に示す通りです。
$ gdisk /dev/loop0
GPT fdisk (gdisk) version 1.0.3

Partition table scan:
  MBR: protective
  BSD: not present
  APM: not present
  GPT: damaged

****************************************************************************
Caution: Found protective or hybrid MBR and corrupt GPT. Using GPT, but disk
verification and recovery are STRONGLY recommended.
****************************************************************************

Command (? for help): ?
b   back up GPT data to a file
c   change a partition's name
d   delete a partition
i   show detailed information on a partition
l   list known partition types
n   add a new partition
o   create a new empty GUID partition table (GPT)
p   print the partition table
q   quit without saving changes
r   recovery and transformation options (experts only)
s   sort partitions
t   change a partition's type code
v   verify disk
w   write table to disk and exit
x   extra functionality (experts only)
?   print this menu

Command (? for help): p
Disk /dev/loop0: 1953525168 sectors, 931.5 GiB
Sector size (logical/physical): 512/512 bytes
Disk identifier (GUID): B45D2A5C-F9A4-478D-818B-D8E6280ABEA4
Partition table holds up to 128 entries
Main partition table begins at sector 2 and ends at sector 33
First usable sector is 34, last usable sector is 1953525134
Partitions will be aligned on 8-sector boundaries
Total free space is 4642 sectors (2.3 MiB)

Number  Start (sector)    End (sector)  Size       Code  Name
   1            2048          534527   260.0 MiB   EF00  EFI system partition
   2          534528          567295   16.0 MiB    0C01  Microsoft reserved ...
   3          567296      1926947658   918.6 GiB   0700  Basic data partition
   4      1926948864      1929021439   1012.0 MiB  2700
   5      1929022863      1953525134   11.7 GiB    2700  Basic data partition

Command (? for help): v
Partition(s) in the protective MBR are too big for the disk! Creating a
fresh protective or hybrid MBR is recommended.

Caution: Partition 5 doesn't begin on a 8-sector boundary. This may
result in degraded performance on some modern (2009 and later) hard disks.

Consult http://www.ibm.com/developerworks/linux/library/l-4kb-sector-disks/
for information on disk alignment.

Identified 1 problems!

Command (? for help): b
Enter backup filename to save: backup-partition.dat
The operation has completed successfully.

Command (? for help): x
Expert command (? for help): ?
a   set attributes
c   change partition GUID
d   display the sector alignment value
e   relocate backup data structures to the end of the disk
f   randomize disk and partition unique GUIDs
g   change disk GUID
h   recompute CHS values in protective/hybrid MBR
i   show detailed information on a partition
j   move the main partition table
l   set the sector alignment value
m   return to main menu
n   create a new protective MBR
o   print protective MBR data
p   print the partition table
q   quit without saving changes
r   recovery and transformation options (experts only)
s   resize partition table
t   transpose two partition table entries
u   replicate partition table on new device
v   verify disk
w   write table to disk and exit
z   zap (destroy) GPT data structures and exit
?   print this menu

Expert command (? for help): s
Current partition table size is 128.
Enter new size (5 up, default 128): 124
Caution: The partition table size should officially be 16KB or larger,
which works out to 128 entries. In practice, smaller tables seem to
work with most OSes, but this practice is risky. I'm proceeding with
the resize, but you may want to reconsider this action and undo it.


Expert command (? for help): v
Warning: The size of the partition table (15872 bytes) is less than the minimum
required by the GPT specification. Most OSes and tools seem to work fine on
such disks, but this is a violation of the GPT specification and so may cause
problems.

Caution: Partition 5 doesn't begin on a 8-sector boundary. This may
result in degraded performance on some modern (2009 and later) hard disks.

Consult http://www.ibm.com/developerworks/linux/library/l-4kb-sector-disks/
for information on disk alignment.

No problems found. 4644 free sectors (2.3 MiB) available in 4
segments, the largest of which is 2015 (1007.5 KiB) in size.

Expert command (? for help): s
Current partition table size is 124.
Enter new size (5 up, default 128): 128
Expert command (? for help): v
Caution: Partition 5 doesn't begin on a 8-sector boundary. This may
result in degraded performance on some modern (2009 and later) hard disks.

Consult http://www.ibm.com/developerworks/linux/library/l-4kb-sector-disks/
for information on disk alignment.

No problems found. 4642 free sectors (2.3 MiB) available in 3
segments, the largest of which is 2014 (1007.0 KiB) in size.

Expert command (? for help): p
Disk /dev/loop0: 1953525168 sectors, 931.5 GiB
Sector size (logical/physical): 512/512 bytes
Disk identifier (GUID): B45D2A5C-F9A4-478D-818B-D8E6280ABEA4
Partition table holds up to 128 entries
Main partition table begins at sector 2 and ends at sector 33
First usable sector is 34, last usable sector is 1953525134
Partitions will be aligned on 8-sector boundaries
Total free space is 4642 sectors (2.3 MiB)

Number  Start (sector)    End (sector)  Size       Code  Name
   1            2048          534527   260.0 MiB   EF00  EFI system partition
   2          534528          567295   16.0 MiB    0C01  Microsoft reserved ...
   3          567296      1926947658   918.6 GiB   0700  Basic data partition
   4      1926948864      1929021439   1012.0 MiB  2700
   5      1929022863      1953525134   11.7 GiB    2700  Basic data partition

Expert command (? for help): w
Final checks complete. About to write GPT data. THIS WILL OVERWRITE EXISTING
PARTITIONS!!

Do you want to proceed? (Y/N): y
OK; writing new GUID partition table (GPT) to /dev/loop0.
Warning: The kernel is still using the old partition table.
The new table will be used at the next reboot or after you
run partprobe(8) or kpartx(8)
The operation has completed successfully.
付録C:gdiskのコマンド一覧
Command (? for help): ?
b   back up GPT data to a file
c   change a partition's name
d   delete a partition
i   show detailed information on a partition
l   list known partition types
n   add a new partition
o   create a new empty GUID partition table (GPT)
p   print the partition table
q   quit without saving changes
r   recovery and transformation options (experts only)
s   sort partitions
t   change a partition's type code
v   verify disk
w   write table to disk and exit
x   extra functionality (experts only)
?   print this menu
Expert command (? for help): ?
a    set attributes
c    change partition GUID
d    display the sector alignment value
e    relocate backup data structures to the end of the disk
f    randomize disk and partition unique GUIDs
g    change disk GUID
h    recompute CHS values in protective/hybrid MBR
i    show detailed information on a partition
j    move the main partition table
l    set the sector alignment value
m    return to main menu
n    create a new protective MBR
o    print protective MBR data
p    print the partition table
q    quit without saving changes
r    recovery and transformation options (experts only)
s    resize partition table
t    transpose two partition table entries
u    replicate partition table on new device
v    verify disk
w    write table to disk and exit
z    zap (destroy) GPT data structures and exit
?    print this menu
- gdiskのrecovery/transformationコマンドの一覧
Recovery/transformation command (? for help): ?
b   use backup GPT header (rebuilding main)
c   load backup partition table from disk (rebuilding main)
d   use main GPT header (rebuilding backup)
e   load main partition table from disk (rebuilding backup)
f   load MBR and build fresh GPT from it
g   convert GPT into MBR and exit
h   make hybrid MBR
i   show detailed information on a partition
l   load partition data from a backup file
m   return to main menu
o   print protective MBR data
p   print the partition table
q   quit without saving changes
t   transform BSD disklabel partition
v   verify disk
w   write table to disk and exit
x   extra functionality (experts only)
?   print this menu


